User Management
User Management is available exclusively to administrators who need to manage organization members, roles, and access permissions.
This guide covers managing users and their permissions through the admin panel administrative panel. User management provides centralized control over organization members, roles, and access permissions.
Overview
The User Management section allows administrators to:
- Create and manage organization users
- Assign roles and permissions
- Control user access and status
- Set passwords and account settings
- Monitor user status
Accessing User Management
- Navigate to the admin panel
- Select the Organization in in which you want to create the user from the top-left button.
- Select Users to access the User Management interface
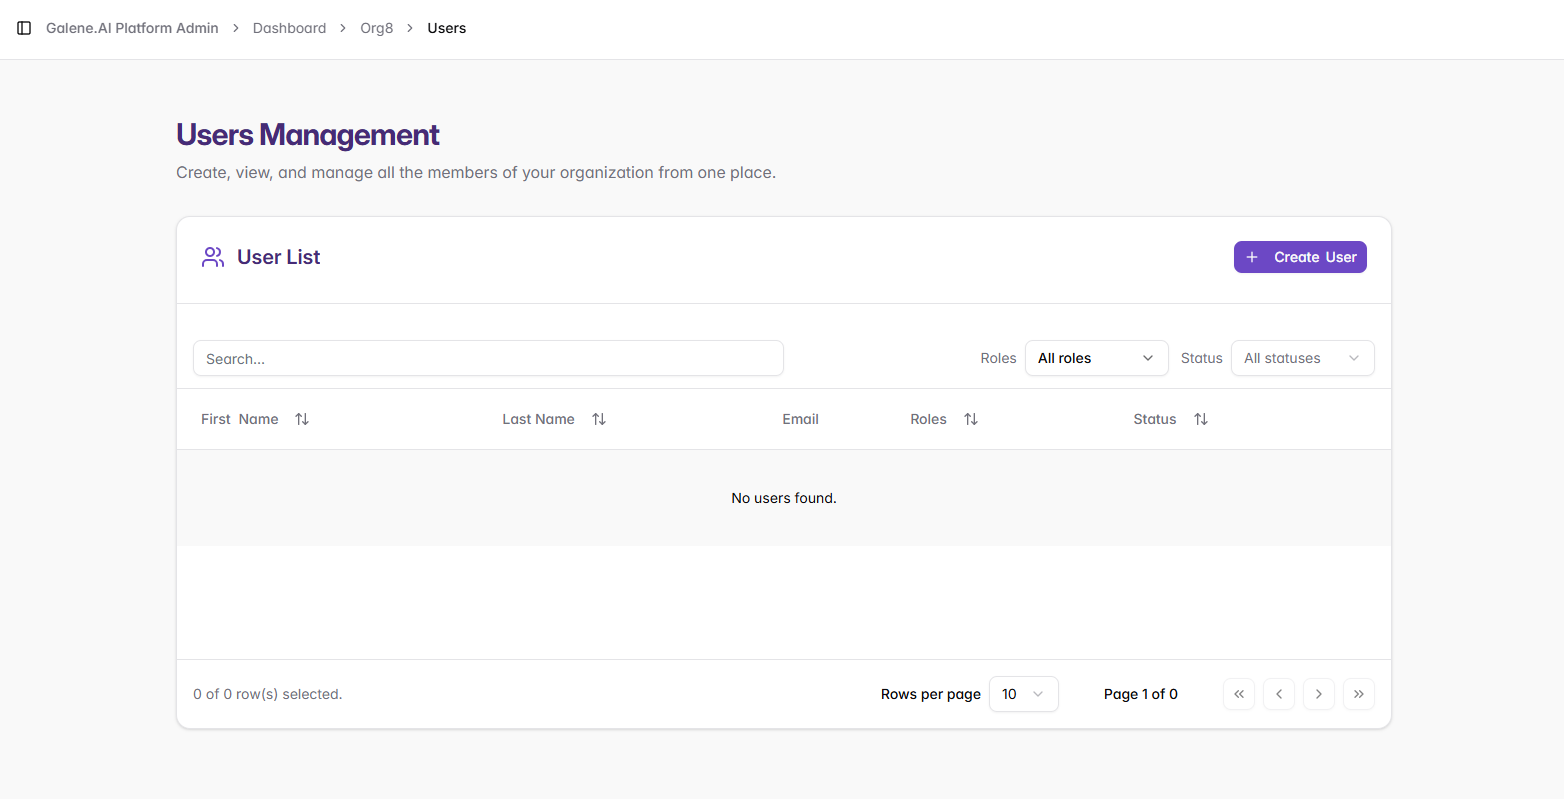
User Management Interface
Empty Organization View
When an organization has no users yet, you'll see an empty user list with the message "No users found". The super admin user only appears in the default organization or organizations where they were specifically created.
Key elements of the interface:
- Create User button (top right) to add new users
- Search functionality to find specific users
- Roles and Status filters for user management
- User list table with columns for First Name, Last Name, Email, Roles, and Status
Creating New Users
Step 1: Initiate User Creation
Click the Create User button to open the user creation form.
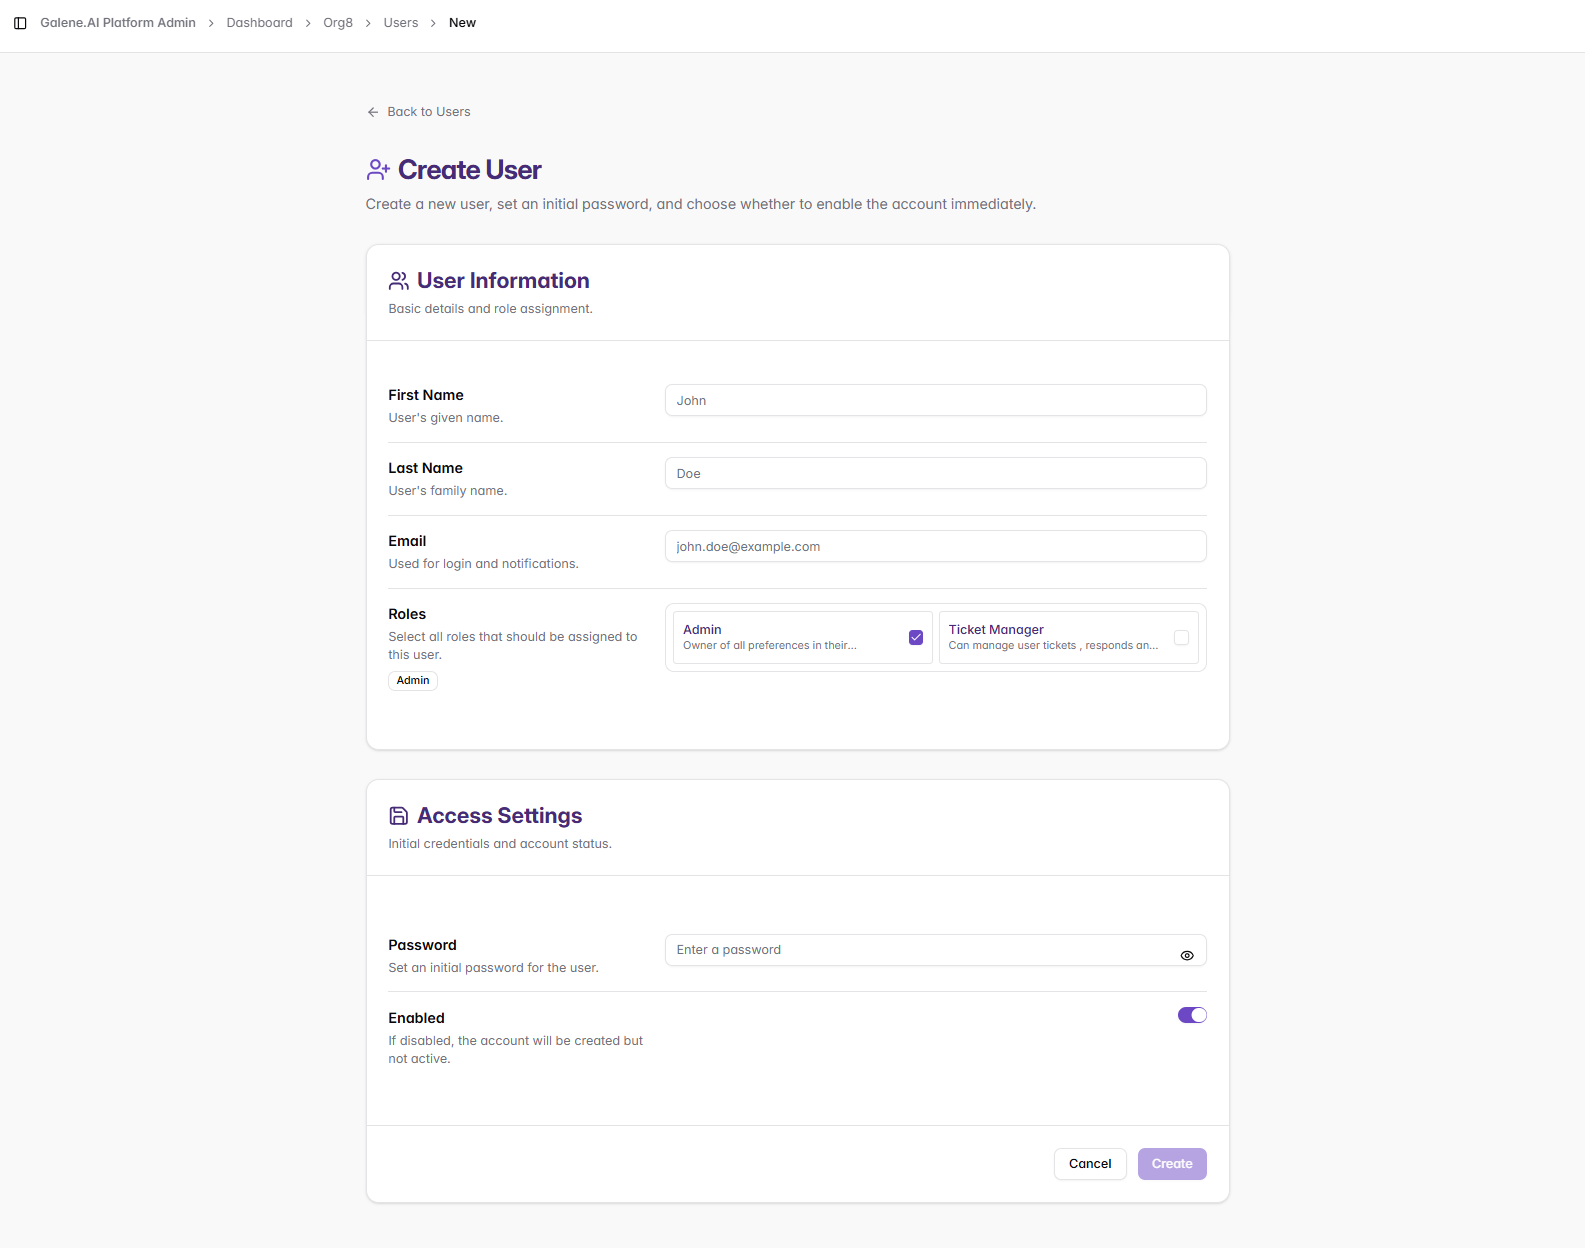
Step 2: User Information Configuration
Basic User Details
- First Name: User's given name (e.g., "John")
- Last Name: User's family name (e.g., "Doe")
- Email: User's email address for login and notifications (e.g., "john.doe@example.com")
Role Assignment
Users can be assigned one or more roles from the roles created in your organization's Roles & Permissions section. Role assignments determine:
- Which connectors (KB, Database, MCP) the user can access
- Which agents the user can interact with
- What platform features and permissions the user has
Multiple roles can be assigned to a single user to provide comprehensive access permissions. For more information about creating and managing roles, see Roles & Permissions.
Step 3: Access Settings
Password Configuration
- Set an initial password for the user.
- Users can change this password after their first login.
Account Status
- Enabled: Toggle to activate the account immediately.
- If disabled, the account will be created but will remain inactive.
Managing Existing Users
User Actions Menu
Click the three dots (⋮) next to any user to access the following options:
Available Actions:
- Edit User: Modify user's personal information.
- Manage Roles: Update role assignments.
- Set Password: Change the user's password.
- API Keys: Manage API keys for the user.
- Re-enable: Reactivate disabled accounts (when applicable).
- Delete: Remove the user from the organization.
Editing User Information
After a user has been created, you can modify their information at any time. From the user actions menu (⋮), click on "Edit User" to perform the following operations:
Edit User Information
- Update the user's first name, last name, and email address.
- Email changes may require user re-verification.
Manage Roles
- Add or remove role assignments for the user.
- Check/uncheck roles to modify access permissions.
Set Password
- Update the user's password (the user can change it again after the next login).
API Keys Management
- Create API Keys: Generate new API keys for the user to allow programmatic access.
- Disable Keys: Temporarily revoke access for a specific key without deleting it.
- Delete Keys: Permanently remove API keys when they are no longer needed.
Disable/Re-enable User
- Disable users to revoke all platform access while retaining their data.
- Re-enable previously disabled users to restore their access.
Delete User
- Permanently remove the user from the organization.
- When deleting from the admin panel, you can reassign the user's organization/shared agents to another admin before confirming the deletion. The user's purely personal agents are still permanently deleted.
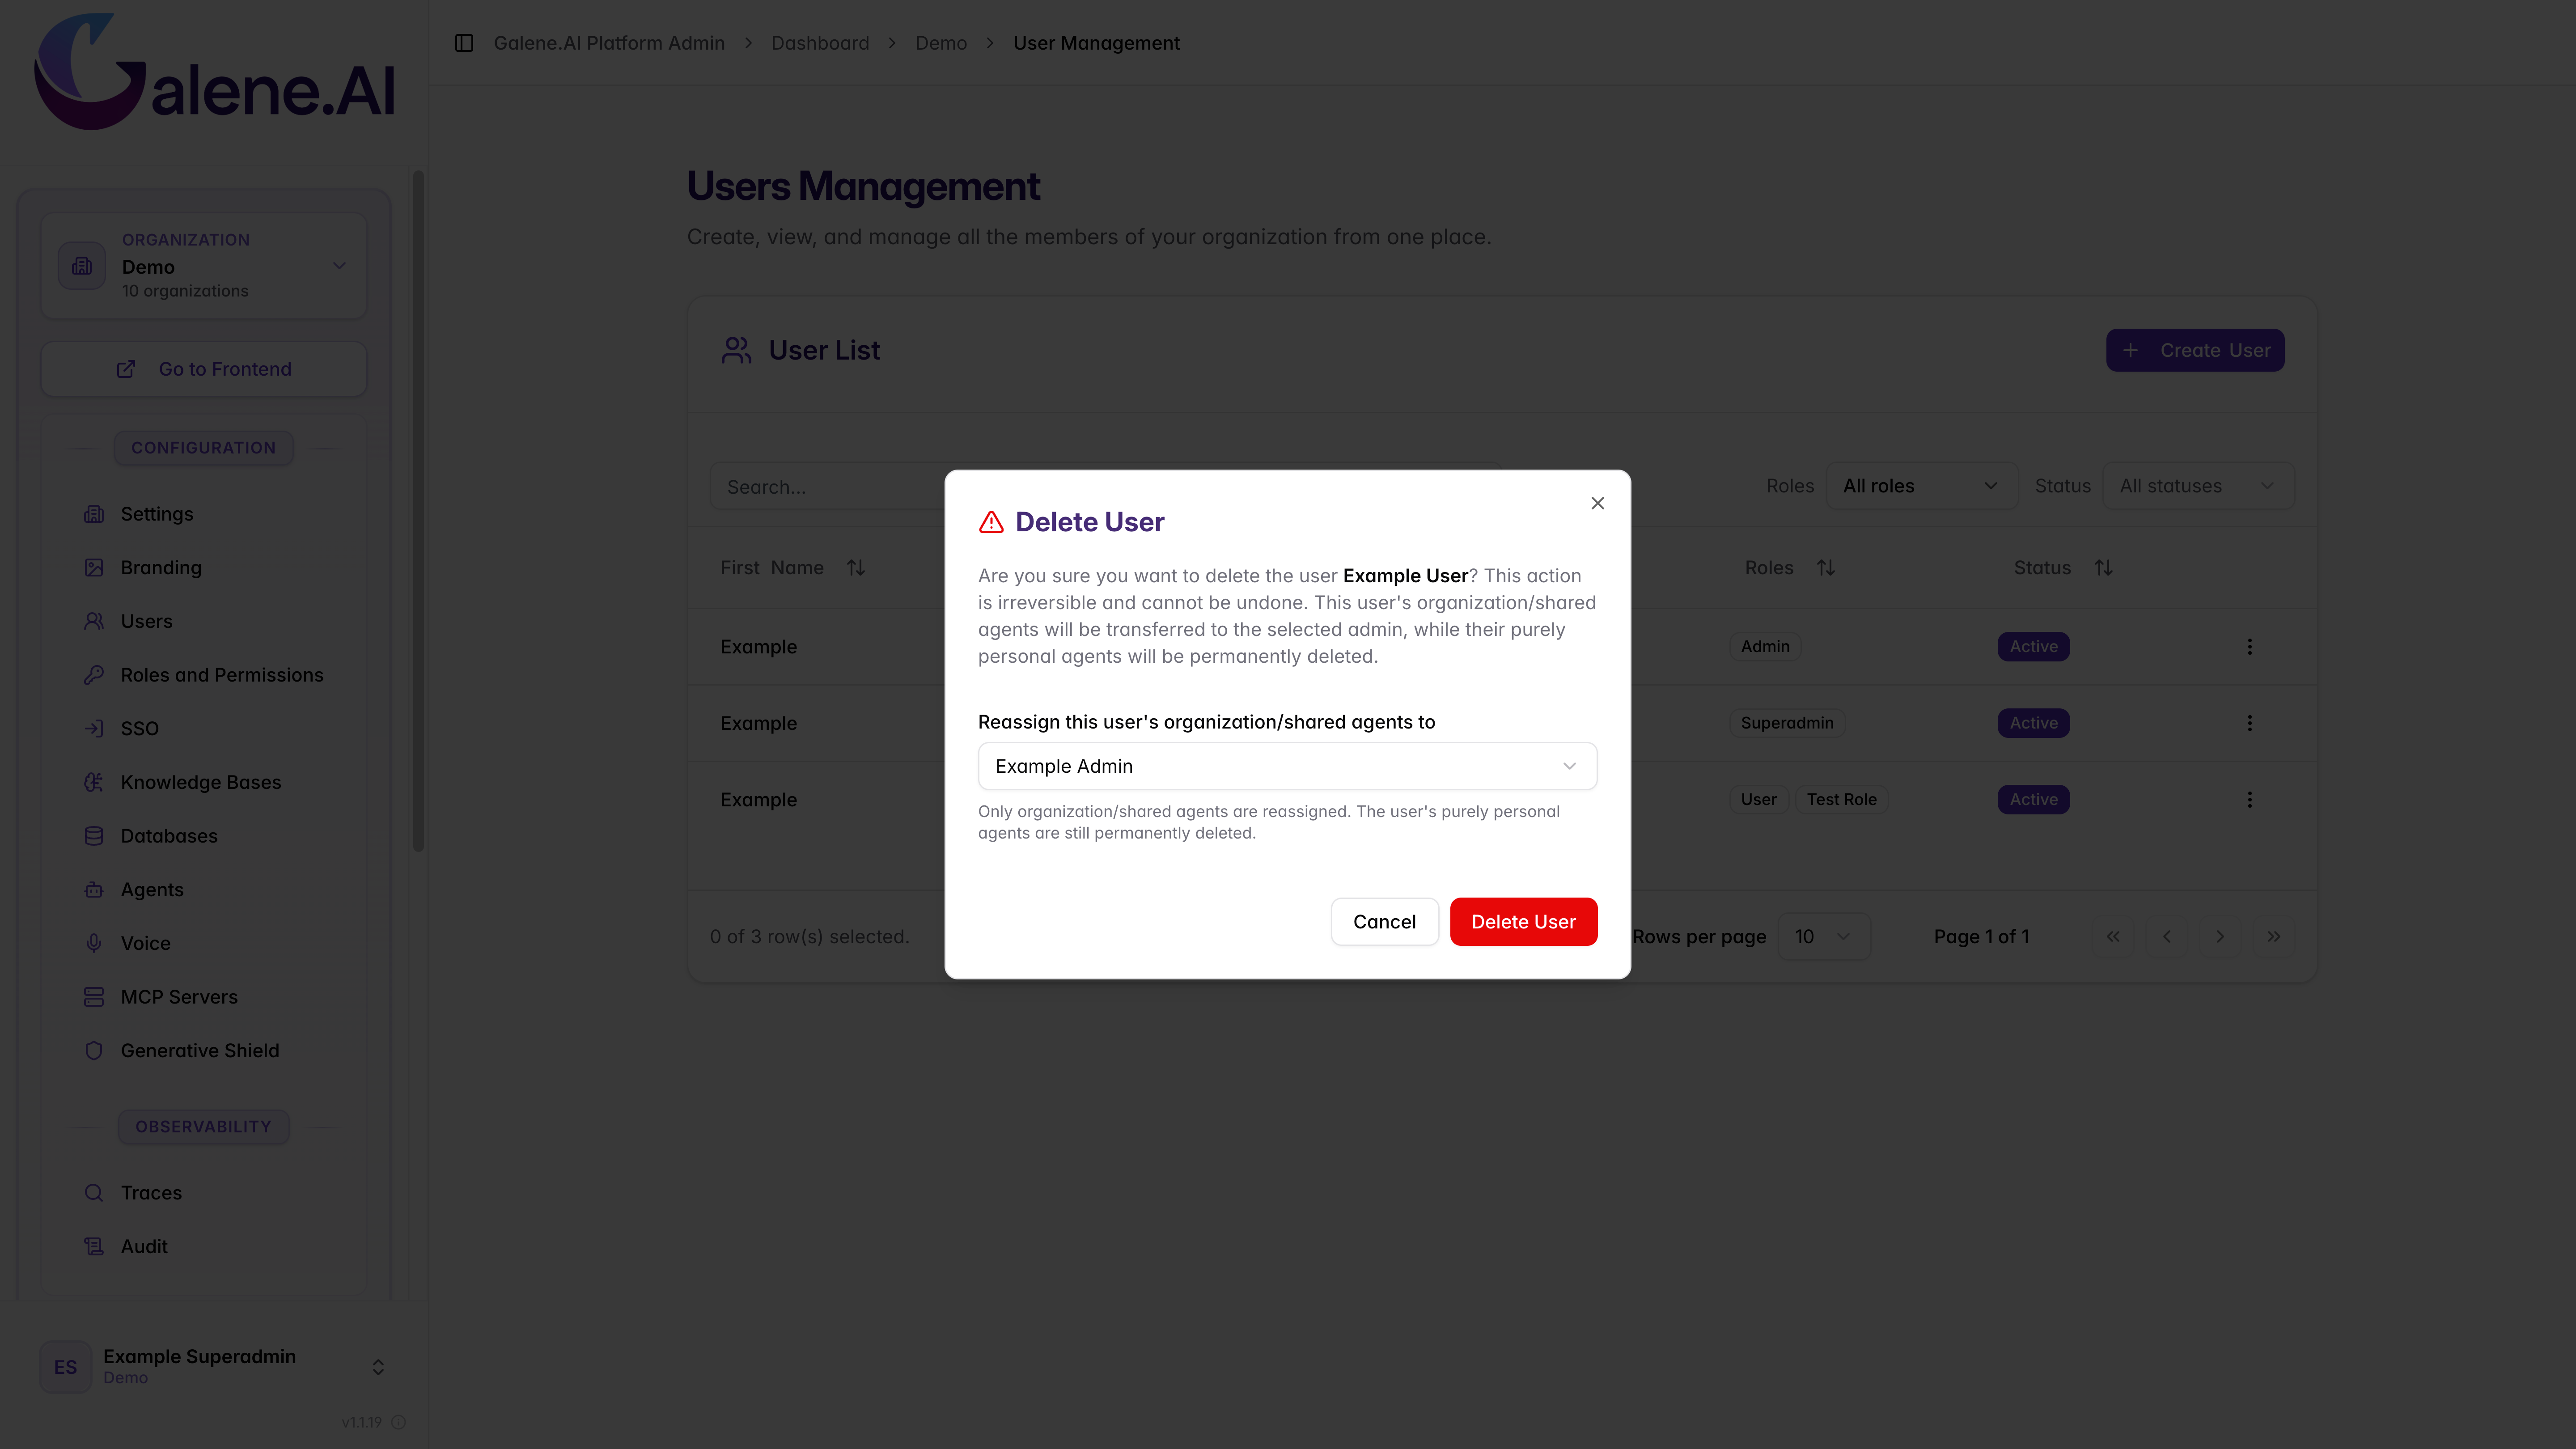
Use with caution as this action cannot be undone. If the user owns organization/shared agents, select another admin to receive them before confirming deletion. Purely personal agents are still permanently deleted.
SSO Users and Admin Access
Users who sign in exclusively through SSO do not have a local password set on their account. This is by design: SSO delegates authentication entirely to the external identity provider.
However, the admin panel does not support SSO login as a security measure. If an SSO user is promoted to an administrator role and needs to access the admin panel, a local password must be configured for their account.
To set a local password for an SSO user:
- By an administrator: From the User Management interface, locate the user → click the actions menu (⋮) → Set Password → define a password and communicate it securely to the user.
- By the user: The user can set their own password from the platform's profile settings page.
Until a local password is set, an SSO user promoted to admin will not be able to access the admin panel, even though their role grants the permission.
User Status Types
| Status | Description |
|---|---|
| Active | Active users have full access to their assigned platform features and can log in to use all permitted functions. |
| Disabled | Disabled users cannot log in or access the platform, but their user data is retained and can be re-enabled by administrators. |
User Creation
- Always set strong initial passwords when creating new accounts.
- Verify email addresses are correct before account creation.
Role & Access Management
- Apply the principle of least privilege—only grant the minimum roles and API permissions needed.
- Regularly audit API keys and delete those that are no longer in use.
- Remove unnecessary role assignments promptly when job responsibilities change.
Account Status
- Deactivate accounts immediately when users leave the organization permanently.
- Use the Disable feature for temporary leaves or security investigations.
User Creation Issues: Email addresses must be unique across organizations. If user creation fails, verify that the email address is not already registered to another user. API Key Security: Once an API key is deleted, any external integrations using that key will stop functioning immediately.
Next Steps
After setting up user management:
- Role Configuration: Define and manage organizational roles
- Agent Access Control: Control agent access by user roles
- Organization Settings: Configure organization-wide settings
- Security Configuration: Implement content moderation and security
For user-focused documentation, see User Guides. For advanced administrative features, see Admin Panel Overview.