SSO (Single Sign-On)
SSO Configuration is available exclusively to administrators who need to integrate external identity providers for organization-wide authentication.
Overview
The SSO (Single Sign-On) configuration allows organizations to integrate with external identity providers, enabling users to authenticate using their existing corporate credentials. This streamlines the login process and centralizes user management through established identity systems.
The platform supports two main SSO provider types:
- Google Workspace — Integration with Google's enterprise identity system
- Microsoft 365 — Integration with Microsoft Entra ID (Azure Active Directory)
How SSO Works
SSO connects your organization's identity provider (Google/Microsoft) with the platform's authentication system. Users authenticate with corporate credentials, information is synchronized automatically, and access control remains centralized.
Authentication Flow
- User attempts platform access
- Redirected to identity provider (Google/Microsoft)
- User authenticates with corporate credentials
- Provider confirms authentication and returns user information
- Platform creates/updates user account and grants access
Accessing SSO Configuration
- Navigate to your organization's admin panel
- From the left sidebar, select SSO Configuration or Identity Providers
- Click New SSO Connector to add a new identity provider
Google Workspace SSO
Google Workspace SSO allows users to authenticate using their Google corporate accounts.
Prerequisites
Before configuring Google SSO on the platform, you must have:
- An active Google Workspace plan (Business, Enterprise, or Education)
- Admin access to the Google Cloud Console with permissions to create OAuth 2.0 credentials
- A Google Cloud project with the OAuth consent screen already configured (user type, app name, and required scopes)
- An OAuth 2.0 Client ID of type Web application, with the Galene.AI redirect URI added to the authorized redirect URIs
The required OAuth scopes are openid, email, and profile. If you plan to enable mailbox or Google Drive authorization, the corresponding scopes (gmail.readonly, drive.readonly) must also be configured on the consent screen.
For details on creating OAuth credentials and configuring the consent screen, refer to the Google Cloud OAuth 2.0 documentation.
Configuration Fields
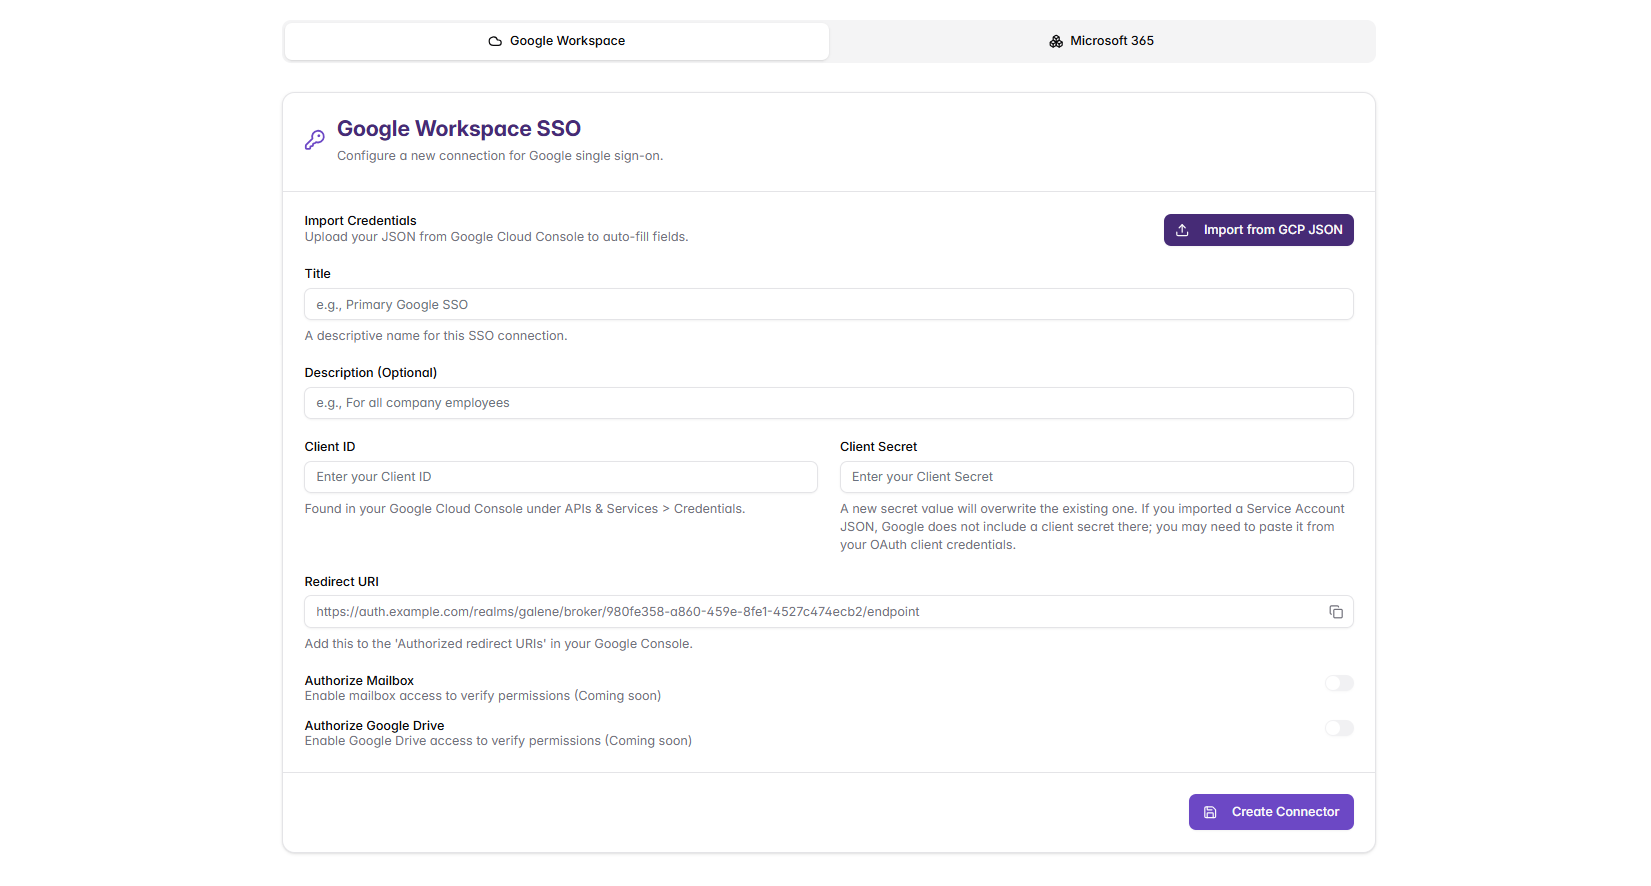
Once the Google Cloud prerequisites are ready, enter the following in the Galene.AI SSO configuration form:
Required Fields:
| Field | Description |
|---|---|
| Title | A descriptive name for this SSO connection (e.g., "Primary Google SSO") |
| Description | Optional description explaining the purpose |
| Client ID | The OAuth 2.0 Client ID from Google Cloud Console |
| Client Secret | The OAuth 2.0 Client Secret from Google Cloud Console |
| Redirect URI | Auto-generated by the platform — this is the URI that must be added to Google Cloud's authorized redirect URIs |
OAuth Configuration:
- Import from GCP JSON: Upload the JSON file downloaded from Google Cloud Console to auto-fill Client ID and Client Secret
- Redirect URI match: The redirect URI shown in the form must match exactly what is configured in Google Cloud Console — any mismatch will cause authentication failures
Permission Scopes:
- Authorize Mailbox: Enable mailbox access verification (requires
gmail.readonlyscope on the consent screen) - Authorize Google Drive: Enable Google Drive access verification (requires
drive.readonlyscope on the consent screen)
Microsoft 365 SSO
Microsoft 365 SSO integrates with Microsoft Entra ID (formerly Azure Active Directory) for enterprise authentication.
The integration requires two distinct resources in Entra ID:
- App Registration — defines the application identity (client ID, secret, redirect URI, permissions)
- Enterprise Application — the instance of the app in your tenant, where you manage user assignment and Conditional Access policies
Both are created automatically when you register an app in Entra ID, but require separate configuration.
Prerequisites
Before configuring Microsoft 365 SSO on the platform, you must have:
- An active Microsoft 365 plan with Microsoft Entra ID
- Admin access to Microsoft Entra admin center with permissions to create app registrations
- An App registration in Microsoft Entra ID configured with:
- The Supported account types matching your requirements (single tenant or multi-tenant)
- The Galene.AI redirect URI added as a Web redirect URI
- A Client secret created under Certificates & secrets
- API permissions (delegated) for Microsoft Graph:
openid,email,profile,User.Read— with admin consent granted. If you plan to enable mailbox or SharePoint authorization, addMail.Readand/orSites.Read.Allrespectively - Optional claims configured on the ID token:
email,family_name,given_name(Microsoft does not include these by default)
- User profiles in Entra ID populated with First name, Last name, and Email (Contact information) for each user who will access Galene
- Your Directory (tenant) ID and Application (client) ID, available on the app registration overview page
The Discovery Endpoint URL depends on the account type configured in the app registration:
- Single tenant:
https://login.microsoftonline.com/{tenant-id}/v2.0/.well-known/openid-configuration - Multi-tenant:
https://login.microsoftonline.com/common/v2.0/.well-known/openid-configuration
For details on registering applications and configuring permissions, refer to the Microsoft identity platform documentation.
The following sections provide step-by-step instructions for each prerequisite.
Configuration Fields
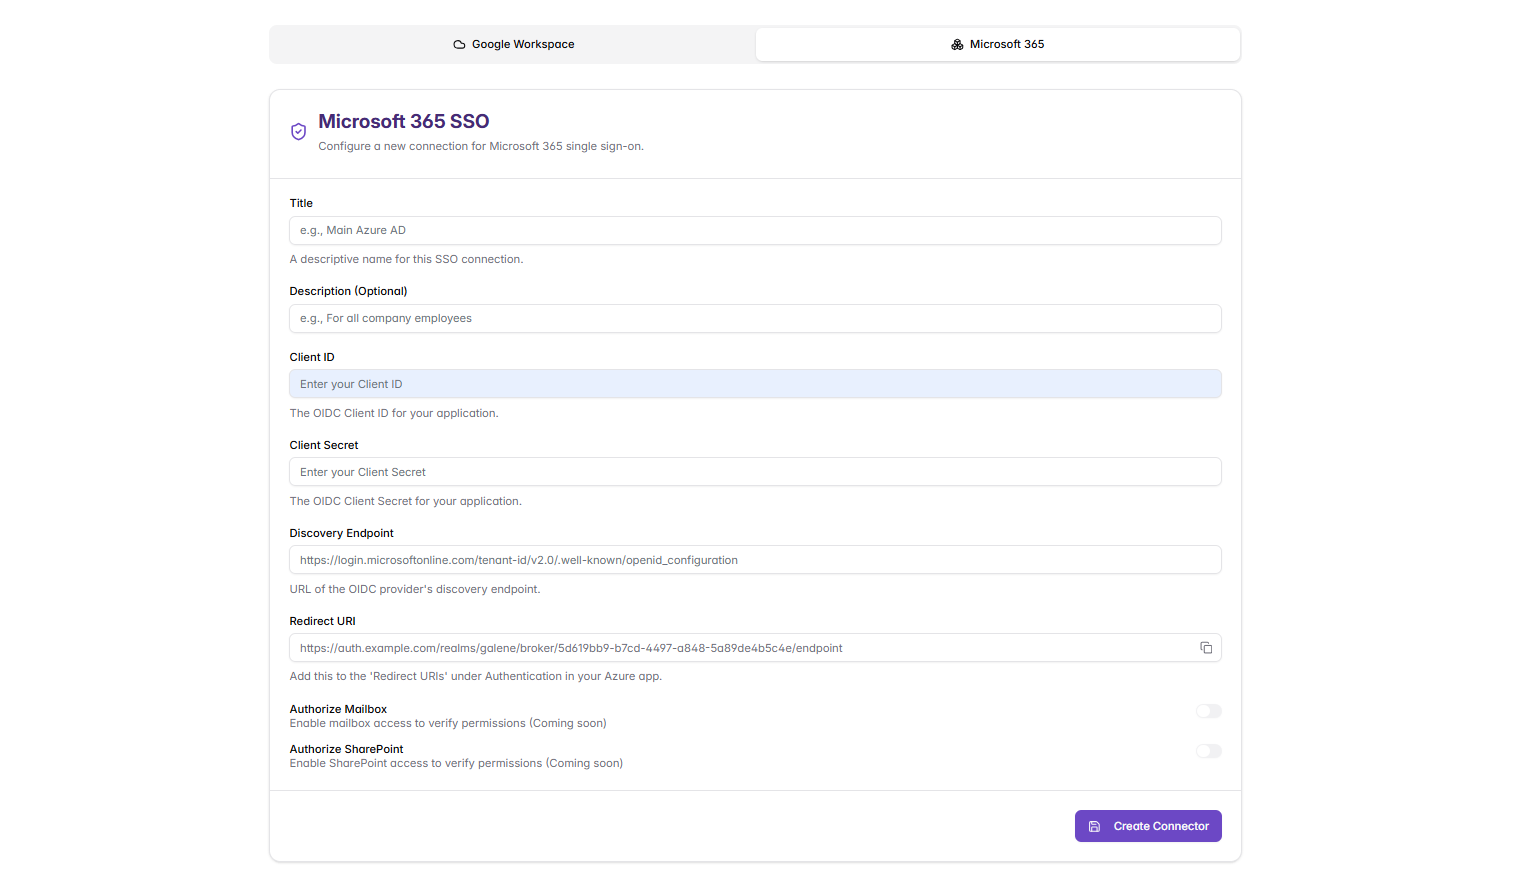
Once the App Registration is ready, enter the following in the Galene.AI SSO configuration form:
Required Fields:
| Field | Description |
|---|---|
| Title | A descriptive name for this SSO connection (e.g., "Main Microsoft 365 SSO") |
| Description | Optional description of the SSO connection |
| Client ID | The Application (client) ID from the app registration |
| Client Secret | The client secret Value (not the Secret ID) — copy it immediately after creation, as Azure only shows it once |
| Discovery Endpoint | The OpenID Connect discovery endpoint URL (single tenant or multi-tenant, see above) |
| Redirect URI | Auto-generated by the platform — add this exact URI to the app registration's redirect URIs |
Auto-Configuration:
- The system automatically fetches authorization endpoints, token endpoints, and signing keys from the discovery endpoint — no manual configuration of these values is required
Advanced Settings:
- Authorize Mailbox: Enable mailbox access verification (requires
Mail.Readdelegated permission with admin consent) - Authorize SharePoint: Enable SharePoint access verification (requires
Sites.Read.Alldelegated permission with admin consent)
App Registration Setup
API Permissions
Misconfigured API permissions are the most common source of SSO setup failures. Pay close attention to permission types.
The sign-in flow uses delegated permissions, which act on behalf of the signed-in user. Application-level permissions are for server-to-server operations and are not used during user login.
Add the following Microsoft Graph → Delegated permissions:
| Permission | Purpose |
|---|---|
openid | Standard OpenID Connect sign-in |
profile | User name, display name |
email | User email address |
User.Read | Read the signed-in user's profile |
After adding all permissions, click Grant admin consent for your tenant and verify that every row shows a green checkmark. If any permission is not in a granted state, non-admin users will see a consent screen they cannot approve — only Global Administrators can bypass this, which can make the configuration appear to work during testing while blocking all regular users.
If Application-type permissions such as User.Read.All are already present, they do not replace the Delegated ones listed above. Removing Application permissions is not mandatory, but the Delegated permissions must still be explicitly added.
Optional Claims
Microsoft does not include given_name, family_name, or email in the ID token by default, even when the profile scope is requested. You must explicitly configure optional claims for these values to appear in the token.
To configure optional claims:
- Go to Azure Portal → Microsoft Entra ID → App registrations → open the App registered for Galene SSO
- In the left menu, select Token configuration
- Click Add optional claim
- Select Token type: ID
- Check the following claims:
emailfamily_namegiven_name
- Click Add
- If Azure shows the banner "Turn on the Microsoft Graph email permission (required for claims to appear in token)", confirm with Add
- Click Save
Optional claims do not need to be configured on the Access token. Galene reads these claims only from the ID token.
User Profile Requirements
For the optional claims to contain actual values, each Azure user who will access Galene must have the following fields populated in their profile (Users → select user → Edit properties → Settings):
| Azure Profile Field | Mapped Claim |
|---|---|
| First name | given_name |
| Last name | family_name |
| Email (Contact information) | email |
The Email field under Contact information is separate from the User Principal Name (UPN). Both may contain an email address, but the email claim is populated from the Contact information field.
If any of these fields is empty, Galene applies automatic fallbacks (e.g., UPN as email, derivation from Display Name), but the user data on the Galene side will be incomplete.
Enterprise Application Setup
Navigate to Microsoft Entra ID → Enterprise applications (a different section from App Registrations) and select the application with the same name.
Assignment required: Set to Yes (recommended) so that only explicitly assigned users and groups can sign in. If set to No, every user in the tenant can authenticate.
Users and groups: Click + Add user/group and assign the users or groups that should have access to the platform.
Being an owner of the App Registration is not the same as being assigned to the Enterprise Application — both are required for access when Assignment required is set to Yes.
Group-Based Authorization (Optional)
Instead of assigning individual users, you can assign Entra ID groups to the Enterprise Application to authorize access in bulk.
Assign to the Enterprise Application the direct groups of which users are members. Members of nested subgroups are not authorized transitively — only users who are direct members of an assigned group will be granted access.
Conditional Access
If your tenant has Conditional Access policies, verify that none of them block users who need to sign in to the platform:
- Go to Microsoft Entra ID → Security → Conditional Access
- Check which policies apply to the Galene app under Cloud apps or actions
- Ensure that assigned users and groups can satisfy the policy requirements (such as MFA or device compliance) in the environment where testing occurs — for example, a dev environment without MFA enrolled may not satisfy a policy that requires it in production
Troubleshooting Microsoft 365 SSO
When users cannot sign in, the first place to look is the Sign-in logs in Entra ID:
- For a specific user: Entra ID → Users → select user → Sign-in logs
- For all sign-ins: Entra ID → Monitoring → Sign-in logs, filter by application
Common error codes and their likely causes:
| Code | Likely cause |
|---|---|
AADSTS65001 | Admin consent has not been granted for one or more permissions |
AADSTS50105 | User is not assigned to the Enterprise Application |
AADSTS53003 | Sign-in blocked by a Conditional Access policy |
AADSTS50020 | User account does not exist in this tenant |
AADSTS90094 | Permissions require admin consent — manual grant needed |
AADSTS500011 | Service principal not found — Enterprise Application missing or was deleted |
Managing SSO Connectors
| Action | Steps |
|---|---|
| Viewing | Access all configured connectors, connection status, authentication statistics, and configuration details |
| Updating | Click connector → update fields → test configuration → save changes |
| Disabling | Set status to disabled to temporarily remove SSO option while maintaining existing sessions |
| Deleting | Ensure no active users → delete connector → system automatically removes the provider configuration |
Security Considerations
OAuth Security:
- Use strong client secrets and rotate them regularly (every 90 days recommended)
- Validate redirect URIs match exactly between provider and platform
- Monitor authentication patterns for unusual activity
- Enable MFA at the provider level for additional security
Provider-Specific Security:
- Google Workspace: Configure OAuth consent screens for internal use only, limit permission scopes to required access, enforce Workspace security policies
- Microsoft 365: Implement Conditional Access policies, enable Entra ID Identity Protection, use security defaults for baseline protection
Access Control:
- SSO users receive default roles automatically on first login
- Administrators can modify role assignments after initial login
- Configure default roles in Organization Settings before enabling SSO
- SSO users do not have a local password. The admin panel does not support SSO login for security reasons — if an SSO user is promoted to admin, a local password must be set. See SSO Users and Admin Access for details.
Setup Checklist
Before enabling an SSO connector for your organization, verify:
- App Registration created with the correct redirect URI
- Client secret generated and securely stored (visible only once)
- API permissions added:
openid,profile,email,User.Read(delegated) - Admin consent granted — all permissions show a green checkmark
- Optional claims configured on ID token:
email,family_name,given_name - User profiles populated with First name, Last name, and Email (Contact information)
- Enterprise Application: users or groups assigned (if Assignment required is Yes)
- Conditional Access policies reviewed, if present in the tenant
- Sign-in tested with at least two users, including one non-admin account
Test sign-in with a non-admin user. Global Administrators can auto-approve consent prompts that would block all regular users, making the configuration appear correct during admin-only testing.
SSO Group Management
What It Does
The platform can automatically synchronize user roles based on the groups defined in your Microsoft Entra (formerly Azure AD) tenant.
In practice:
- The admin selects which Entra groups to "import" as application roles.
- Every user who logs in via Microsoft SSO is automatically assigned (or removed from) the corresponding roles, based on their current group membership in Entra.
- Nested groups are supported: if a user is a member of a sub-group, they also inherit the roles of any imported parent groups.
- Built-in roles (
superadmin,admin,user) are always managed manually — they are never overwritten by SSO sync. - If a user is removed from a group in Entra, they automatically lose the associated role on their next login. Roles assigned manually by an admin are never touched.
The feature is optional and per-organization: if you don't configure anything, SSO login continues to work exactly as before.
Prerequisites on Microsoft Entra
All group synchronization uses Microsoft Graph in application mode (the platform calls Microsoft on behalf of the app, not on behalf of the logged-in user). This means that on the App Registration used for SSO you must:
- Add these three permissions of type Application (NOT Delegated):
Group.Read.AllGroupMember.Read.AllUser.Read.All
- Click "Grant admin consent" on the permissions table. Without this step, Microsoft will reject every call.
- Have a valid, non-expired Client Secret associated with the app (Azure secrets expire by default after 6 months).
- Note the Client ID and Tenant ID of the app (the Tenant ID is also automatically derived from the OIDC discovery endpoint of the SSO connector).
You only need a single App Registration: the same one used for SSO login can also be used for group synchronization.
Configuring Group Sync on the Platform
- Go to Settings → SSO Connectors and open the Microsoft 365 connector for your organization (or create a new one if it doesn't exist).
- Fill in / verify the standard connector fields (Client ID, Client Secret, discovery endpoint, redirect URI). If the data is correct, the connector saves on the first attempt.
- Scroll to the bottom of the form: the "Group Sync" section will appear.
- If you see a red banner "Admin consent required", click "Grant admin consent": a Microsoft window opens, sign in with a tenant admin from your Entra tenant and confirm. When you return, reload and the banner disappears.
- Click "Refresh from Entra" — the complete list of groups from your Microsoft tenant will appear, showing member count and a checkbox for each group.
- Check the groups you want to turn into application roles and click "Save imports". Each selected group becomes a role in the Roles & Permissions section, marked with the "SSO" badge.
- From that point on, any user logging in via SSO is automatically aligned.
Resync Users Manually
Below the group list there is a "Resync all users now" button. Use it when you want to force synchronization for all SSO users in your organization without waiting for their next login (e.g., after adding or removing a new group from the import list).
Removing a Group from the Import List
Uncheck the checkbox and click "Save imports". The associated role is disabled (not deleted): its permissions and associations to knowledge bases / agents remain intact, but users who had the role lose it. If you re-import the same group in the future, the role is reactivated with all its previous associations.
Required Permissions
| Action | Required Role |
|---|---|
| View and modify the "Group Sync" section of the connector | Organization Admin or Superadmin |
| Grant admin consent on Entra | Microsoft tenant Admin (on the Azure side, not the platform side) |
| Automatic SSO login with role assignment | None: end users do not need to do anything |
SSO roles are managed like all other platform roles: you can assign them permissions on knowledge bases, agents, models — there is nothing special about them. The only difference is that the role name and the user membership list are managed automatically by the sync.
FAQ
Can I manually assign an SSO role to a user?
No. The checkbox is disabled on SSO roles because on the user's next login it would be overwritten based on their Entra groups anyway. To give the role to a user, add them to the corresponding group in Entra.
What happens if I delete a group directly in Entra?
On the next refresh the list no longer shows it, and the associated role gradually loses its users. If you want to clean up completely, uncheck the group from the import list and save.
What happens if Microsoft Graph is temporarily down?
Nothing critical: SSO login continues to work. If synchronization fails, users keep the roles they had from the last successful sync. No role is ever removed because of a network error.
Can I temporarily disable the feature?
Yes, uncheck all groups from the "Group Sync" section and save: no SSO roles will be assigned anymore, and users will behave as they did before activation. You don't need to touch the base SSO connector.
Does it work with Google Workspace?
Not yet. Group synchronization is currently available only for Microsoft 365 / Entra ID connectors. Google support is planned as a future enhancement.
Common Errors
| Error | Cause and Fix |
|---|---|
| "Admin consent required" | Go to the App Registration in Azure, Permissions section, and click "Grant admin consent". Permissions must be of type Application, not Delegated. |
| "Client ID not recognized" (or app not found) | The Client ID is incorrect or belongs to an app in a different tenant. Verify that the value is exactly the Application (client) ID from your App Registration overview page (not the Object ID). |
| "Client Secret rejected" | The secret is incorrect or expired. Generate a new client secret in Azure (Certificates & Secrets → New client secret), copy the value immediately (Microsoft only shows it once), and paste it in the UI. |
| "Tenant ID missing" | The connector's discovery endpoint is not tenant-specific. Use the URL https://login.microsoftonline.com/<tenant-id>/v2.0/.well-known/openid-configuration (NOT common or organizations). |
Next Steps
After configuring SSO:
- User Management: Manage user roles and permissions
- Organization Settings: Configure credential login options
- Security Configuration: Implement additional security measures
SSO configuration provides secure, scalable authentication integration with existing identity infrastructure.