Settings and API Keys
Learn how to configure your account settings and generate API keys to authenticate your requests to the Galene.AI API.
How to Access Settings
The Settings page is your central hub for managing your account preferences, personal information, and API authentication credentials.
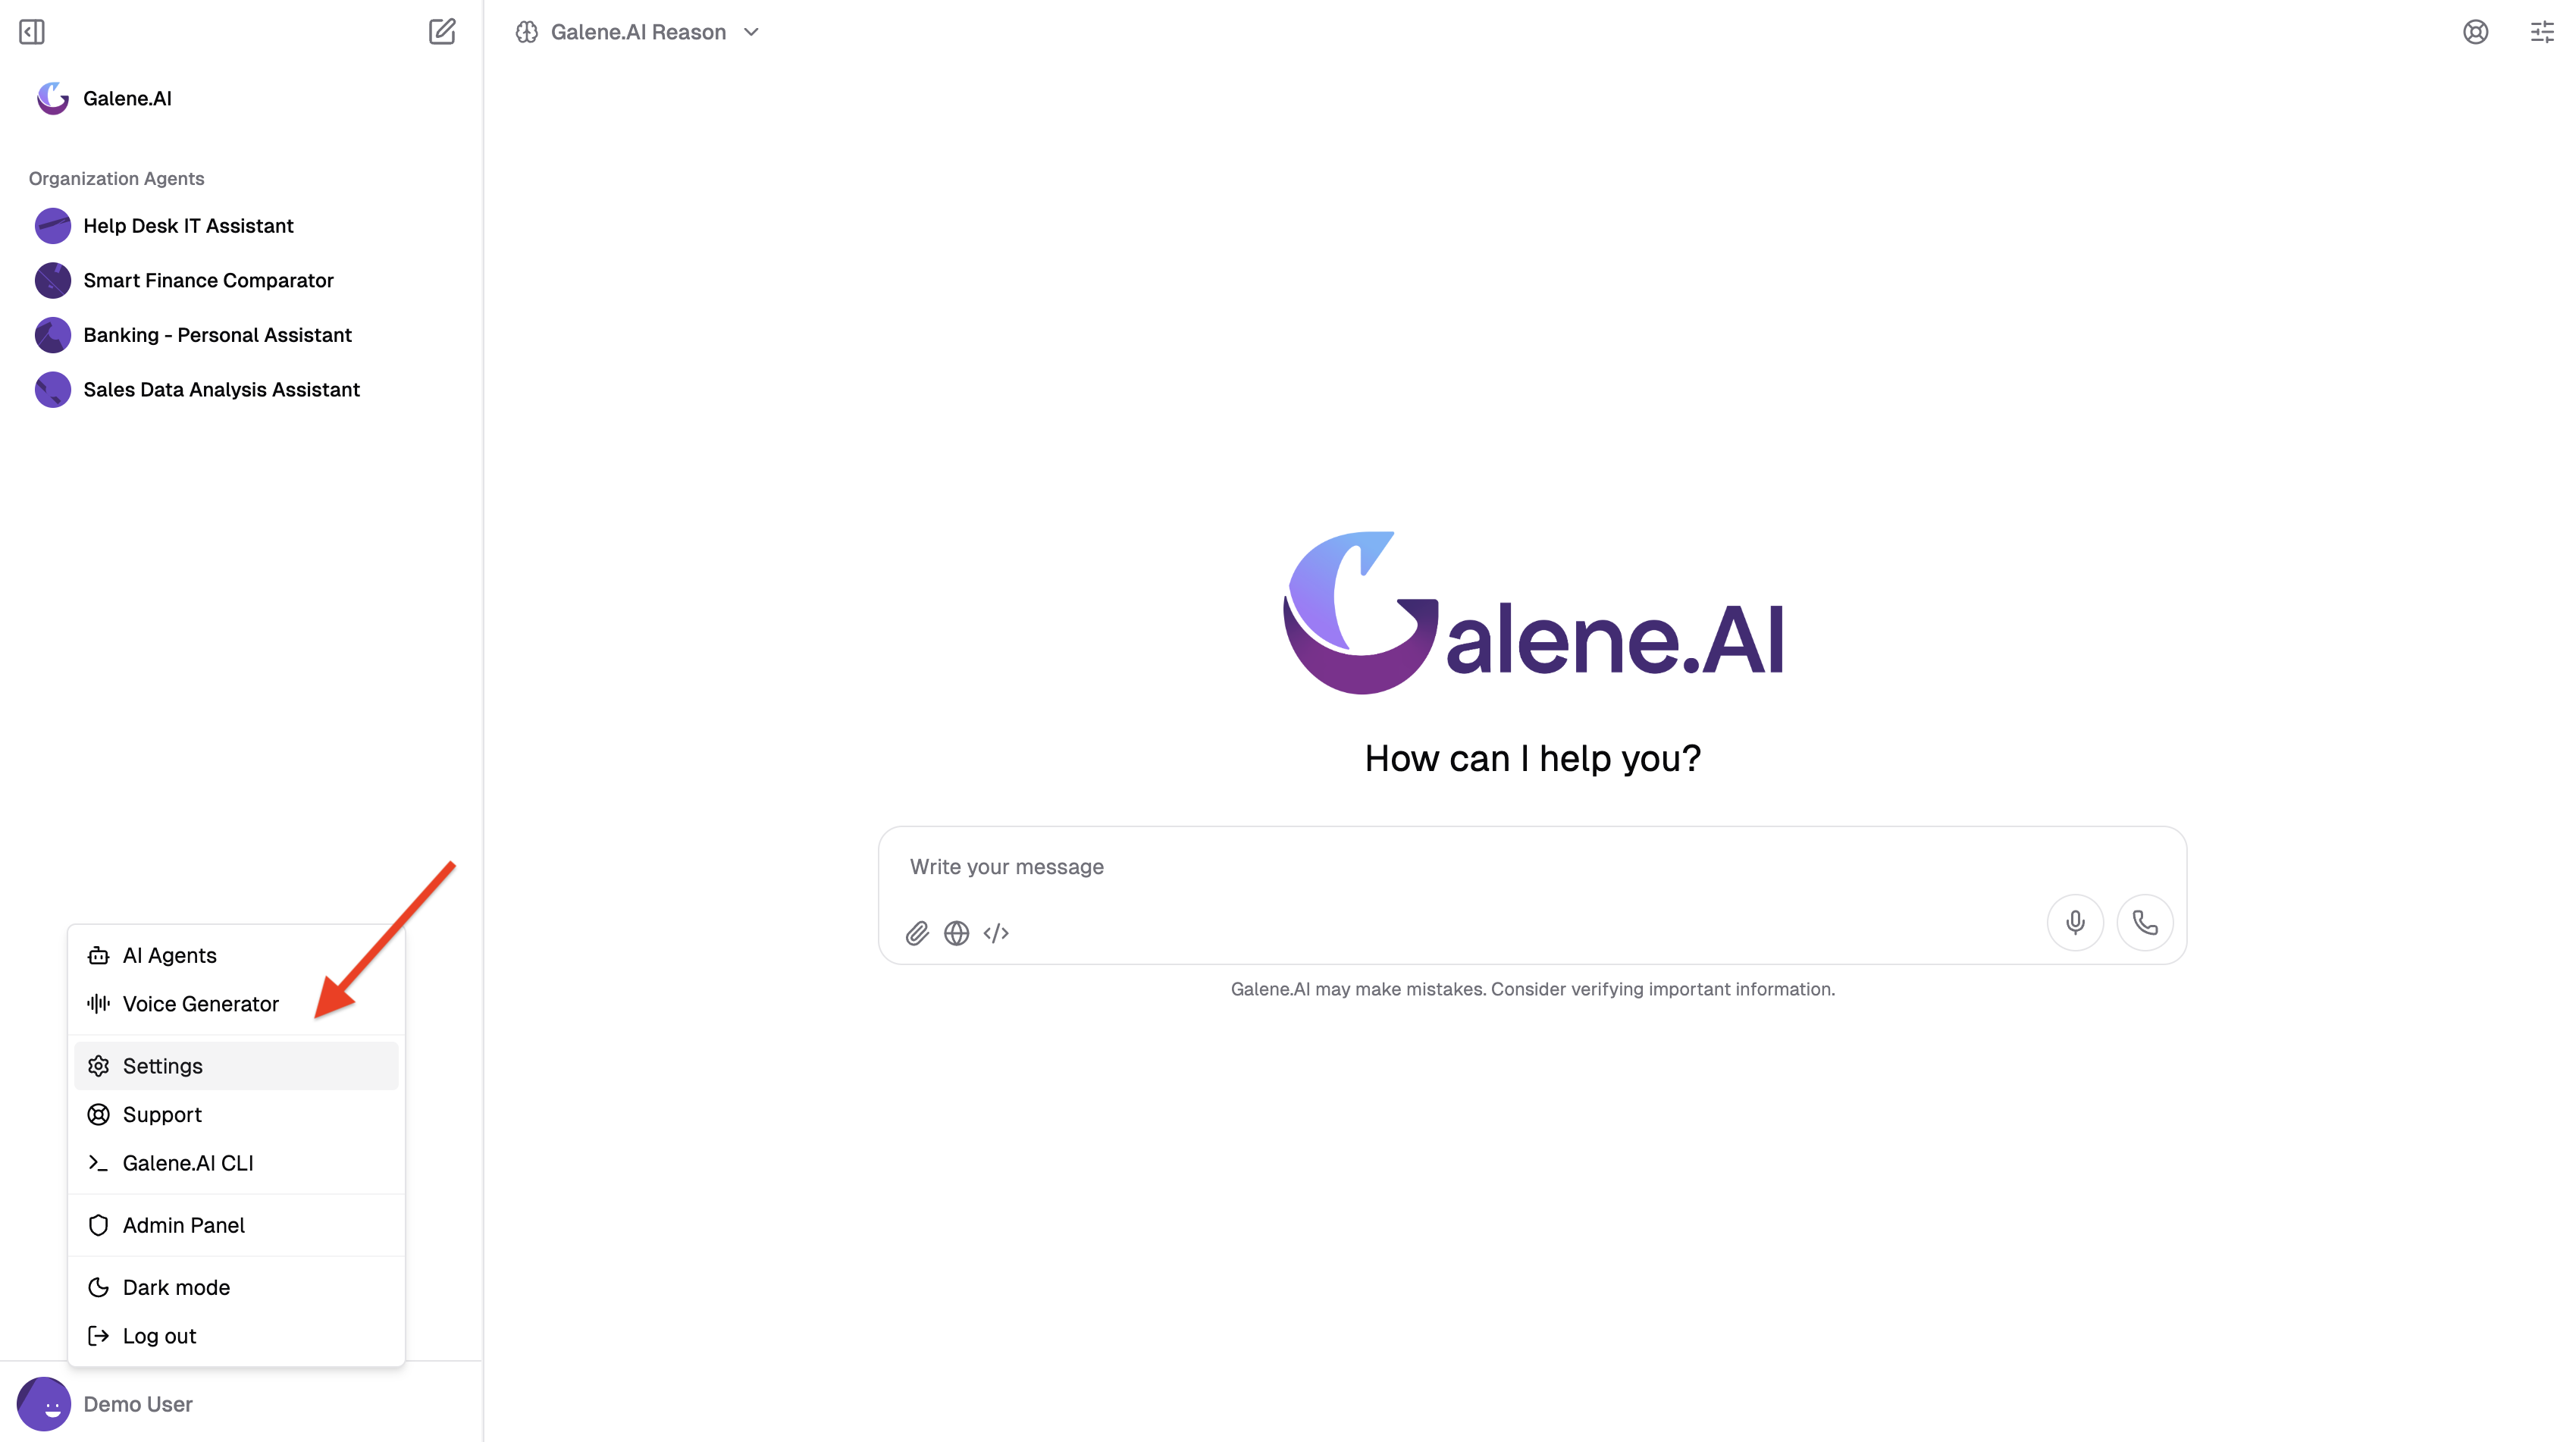
- Log in to your Galene.AI account
- Click on your profile icon or username in the bottom-left corner
- Select Settings from the dropdown menu
User Settings
The Settings page contains three tabs: Settings (for personal preferences), API Key (for API authentication), and Changelog (for platform release notes). Let's start with the general settings.
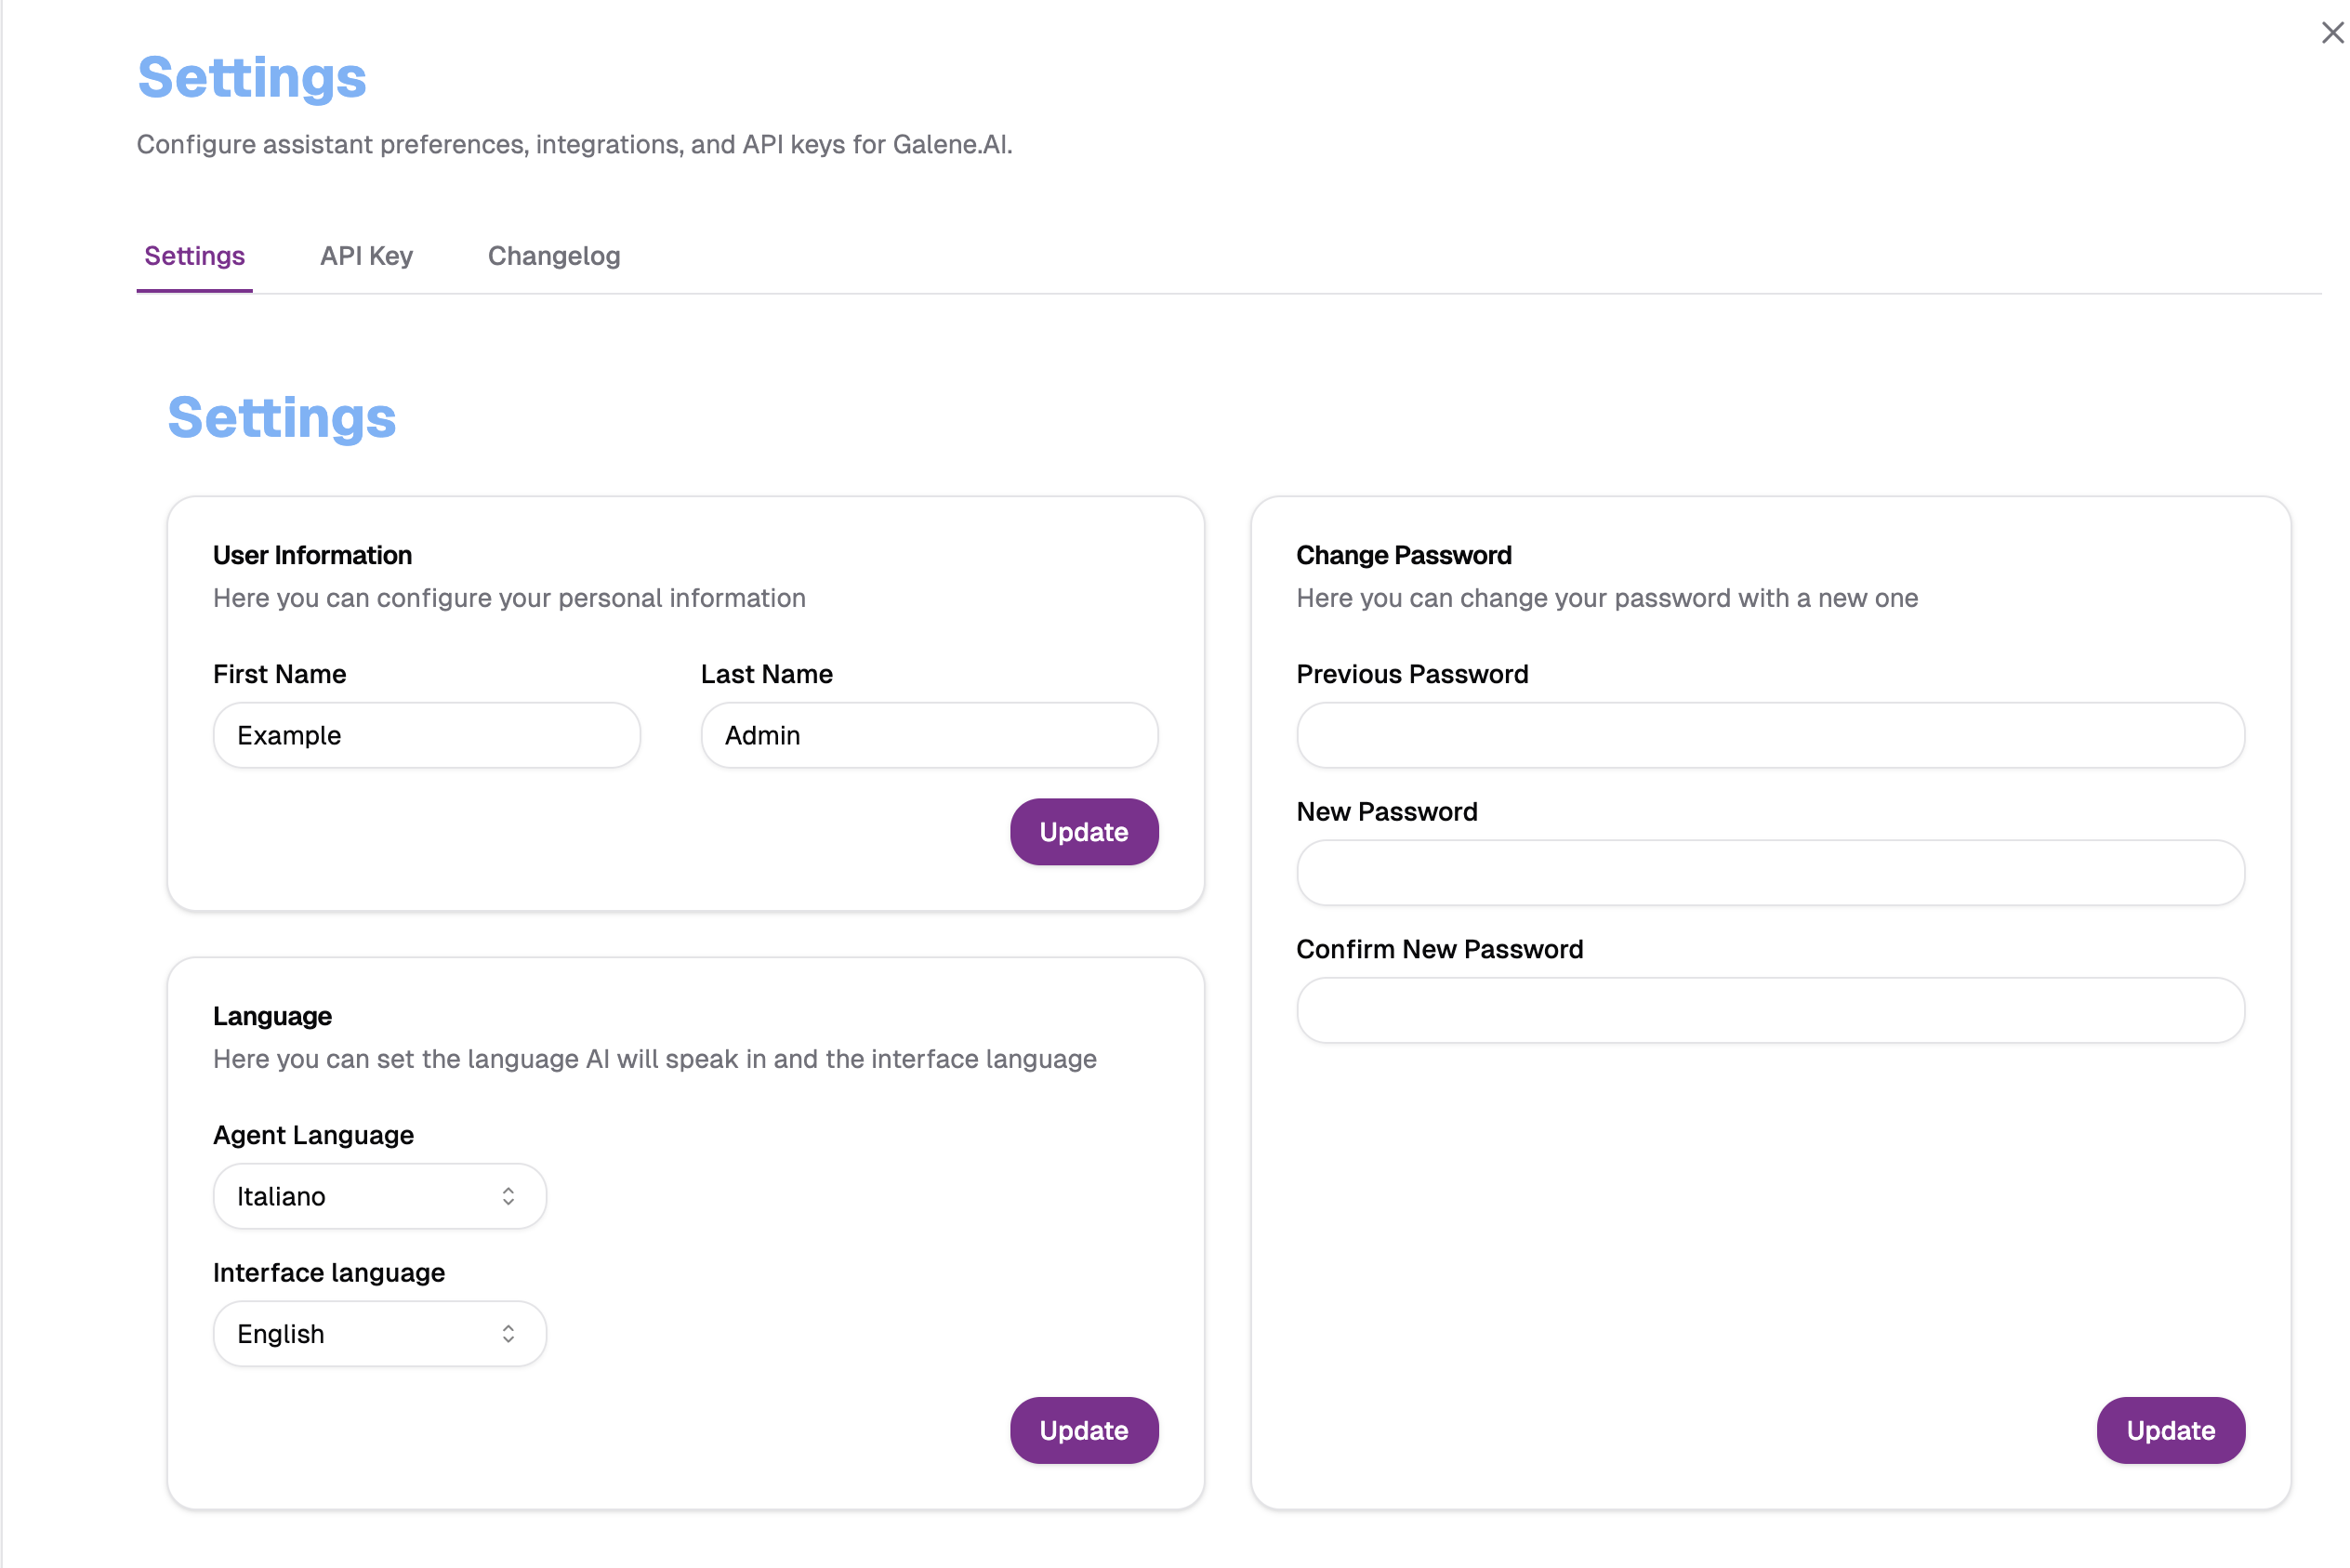
User Information
Update your personal information displayed in your account:
- First Name
- Last Name
After making changes, click the Update button to save your information.
Language Configuration
Customize the language settings for your Galene.AI experience:
Agent Language
Set the language that AI agents will use when communicating with you. This determines the language of agent responses in conversations.
Interface Language
Set the language for the Galene.AI user interface. This changes the language of menus, buttons, and other interface elements.
After adjusting your language preferences, click the Update button to apply the changes.
Change Password
Update your account password for enhanced security:
- Previous Password - Enter your current password
- New Password - Enter your desired new password
- Confirm New Password - Re-enter your new password to confirm
Click the Update button to change your password.
Use a strong password with a mix of uppercase and lowercase letters, numbers, and special characters. Consider using a password manager to generate and store secure passwords.
API Keys
Once you have your API key set up, explore the full API documentation at api.playground.galene.ai/docs to make your first API call and learn about available endpoints and capabilities.
Now let's explore the API Key management features for authenticating your applications with the Galene.AI API.
What is an API Key?
An API key is a secure token that authenticates your application when making requests to the Galene.AI API. It acts as a password that identifies your application and determines what actions you're authorized to perform.
Key Points:
- Your API key inherits your user permissions
- Each key is unique and tied to your account
- Keys can be revoked at any time for security
- Never share your API keys publicly or commit them to version control
Generating Your API Key
Follow these steps to create an API key from your Galene.AI account:
- In the Settings page, click on the API Key tab at the top
- This tab manages all your API authentication credentials
Step 2: Generate a New Key
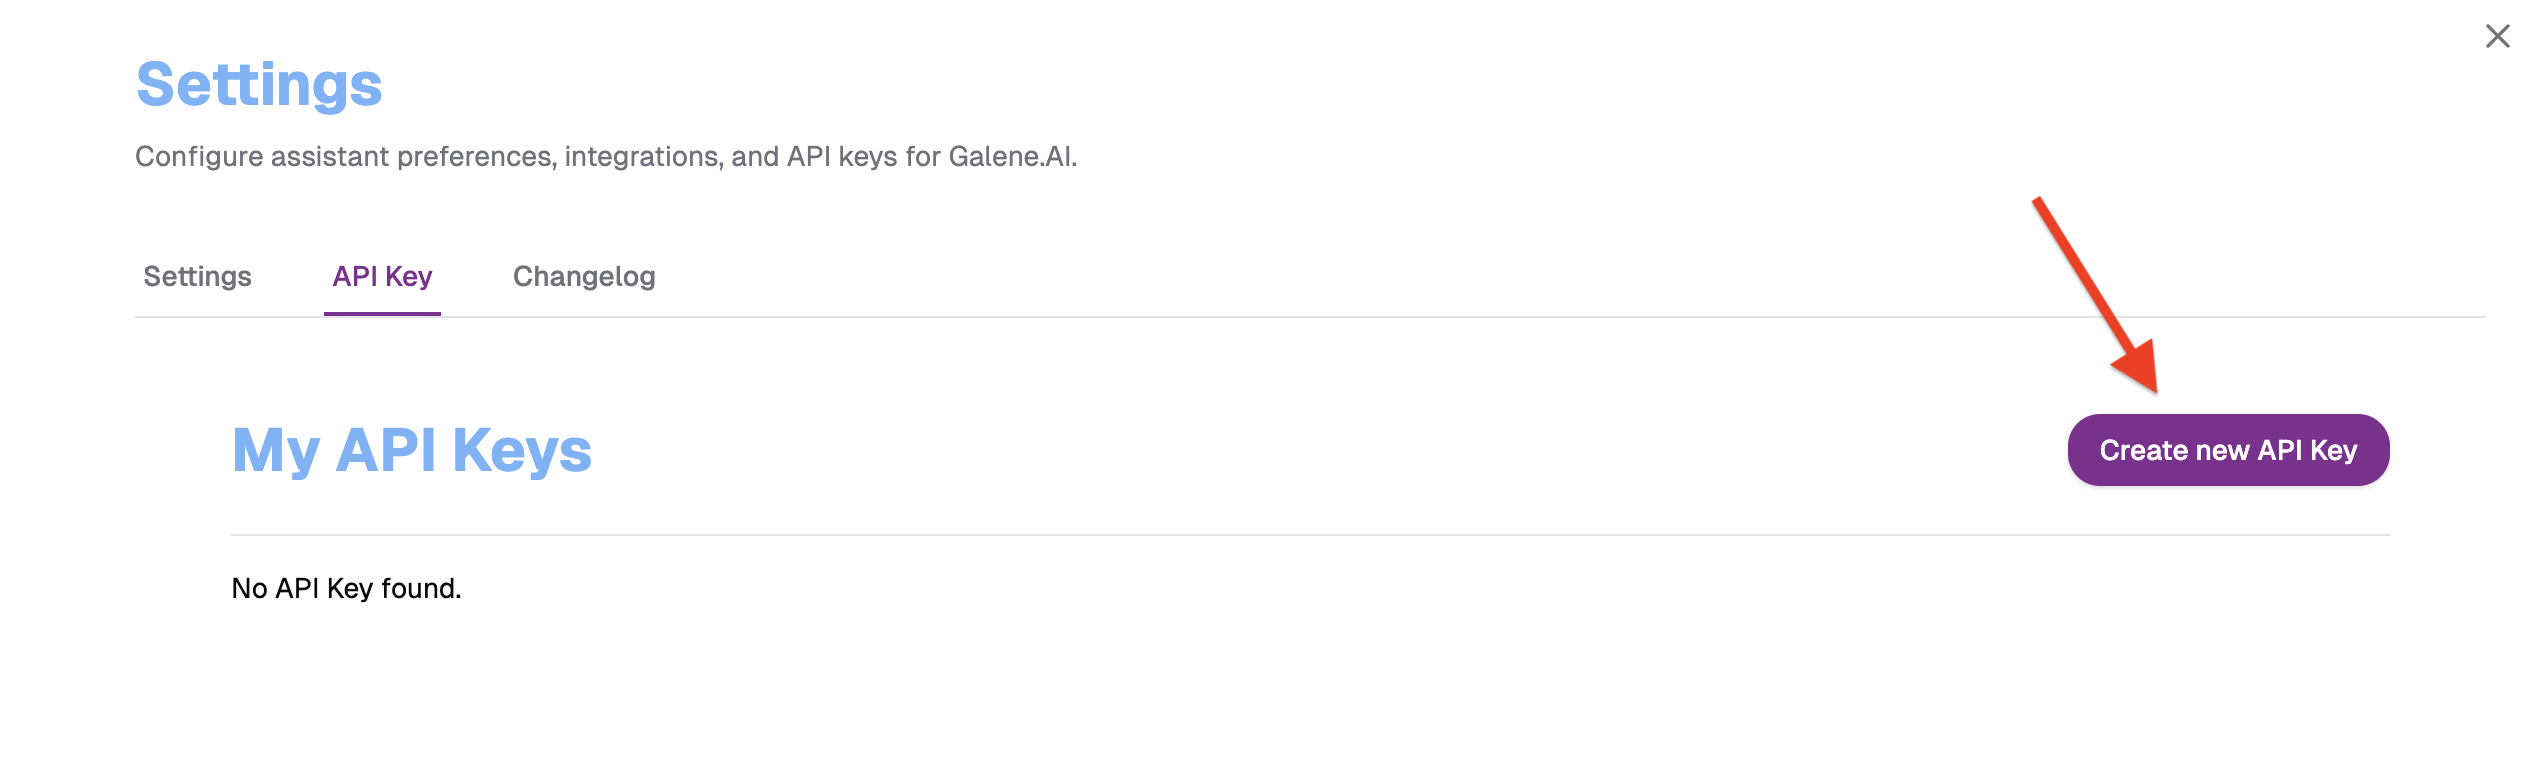
- Click the Create new API Key button
- A dialog window will appear showing your newly generated API key
Once you close the dialog, you won't be able to see the full API key again. If you lose it, you'll need to generate a new one and revoke the old key.
Step 3: Save Your Key Securely
- Copy the API key from the dialog window immediately
- Store it securely in:
- A password manager
- An environment variables file (
.env) - A secure key management system
- Never save it in:
- Your source code
- Public repositories
- Shared documents or chat messages
Using Your API Key
Once you have your API key, include it in all API requests using the Authorization header:
curl -X POST https://api.playground.galene.ai/v1/chat/completions \
-H "Authorization: Bearer YOUR_API_KEY" \
-H "Content-Type: application/json" \
-d '{
  "message": "Hello, Galene!"
}'
Header Format:
Authorization: Bearer YOUR_API_KEY
Replace YOUR_API_KEY with the actual key you generated.
Managing API Keys
In the Settings → API Key section, you can view your existing API keys and manage them.
Viewing Your API Keys
The API keys list displays all your active keys with the following information:
- Key identifier - A partial key for security (e.g.,
gln-abc123....) - Creation date - When the key was generated
- Last used date - When the key was last used to make an API request
- Delete button - To remove the key
For security reasons, the full API key is only shown once when you first generate it. If you didn't copy the key from the creation dialog, you cannot view it again. You can only delete the old key and create a new one.
Deleting API Keys
Any applications using the deleted key will immediately lose access. Ensure you update applications with a new key before deleting the old one.
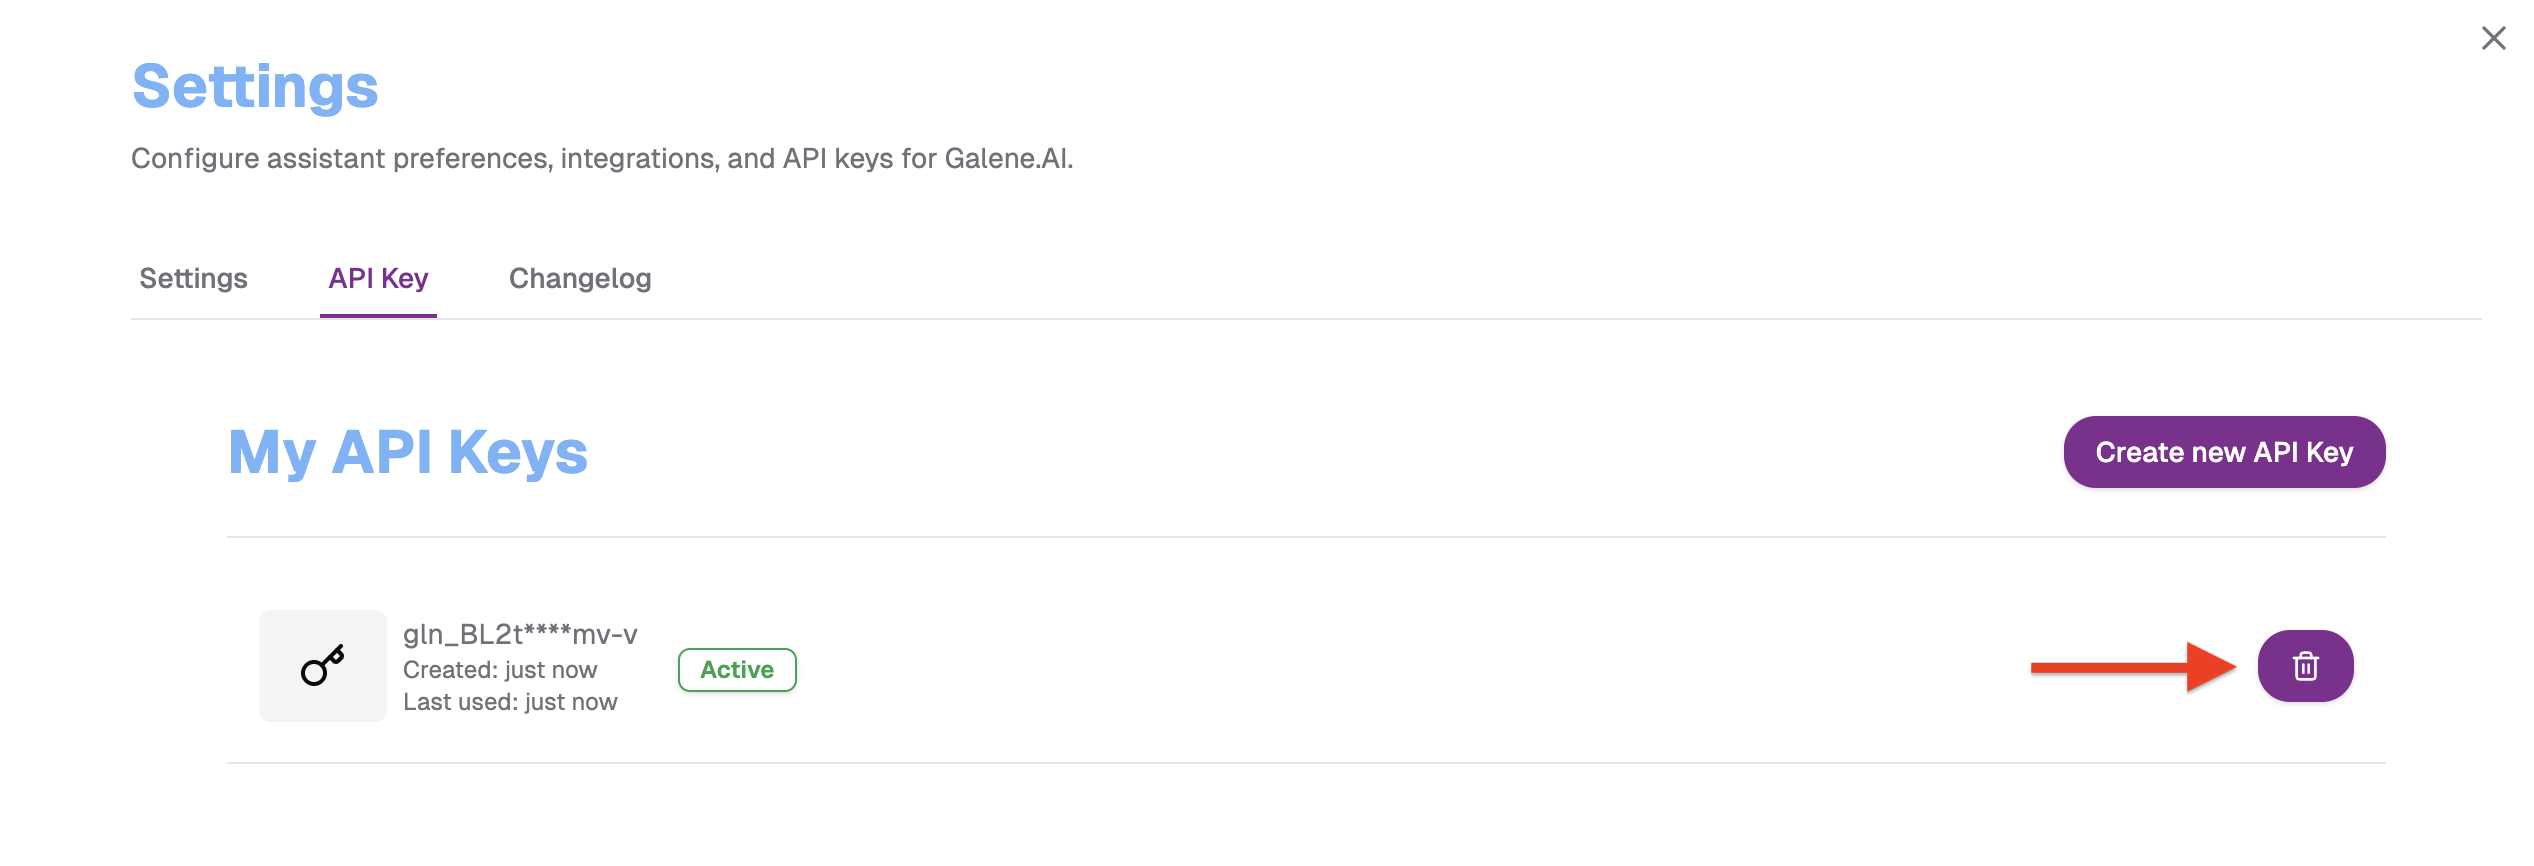
To delete an API key:
- Navigate to Settings → API Key
- Find the key you want to delete in the list
- Click the Delete button next to the key
- Confirm the action
When to delete:
- Key has been accidentally exposed
- Key is no longer needed
- Rotating keys for security
- You lost the key and need to create a new one
- Replacing development keys with production keys
Do's
- ✅ Store keys in environment variables or secure key management systems
- ✅ Use HTTPS for all API requests
- ✅ Revoke keys immediately if compromised
- ✅ Implement rate limiting in your application
- ✅ Rotate keys regularly - Generate new keys periodically and revoke old ones
- ✅ Create separate keys for different environments (development, staging, production)
- ✅ Monitor API key usage regularly to detect unusual activity
Don'ts
- ❌ Never commit keys to Git repositories
- ❌ Don't share keys in chat, email, or documentation
- ❌ Avoid hardcoding keys in source code
- ❌ Don't expose API keys in client-side code or public repositories
401 Unauthorized Error
- Verify your API key is correct
- Check that the key hasn't been revoked
- Ensure the
Authorizationheader is properly formatted
403 Forbidden Error
- Your API key may not have permissions for the requested action
- Check your account permissions and plan limits
Rate Limit Exceeded
- You've exceeded the number of allowed requests
- Implement exponential backoff in your application
- Check your usage limits in the platform
Changelog
The Changelog tab in Settings gives every user access to the full platform release history directly from the interface — no need to consult external documentation.
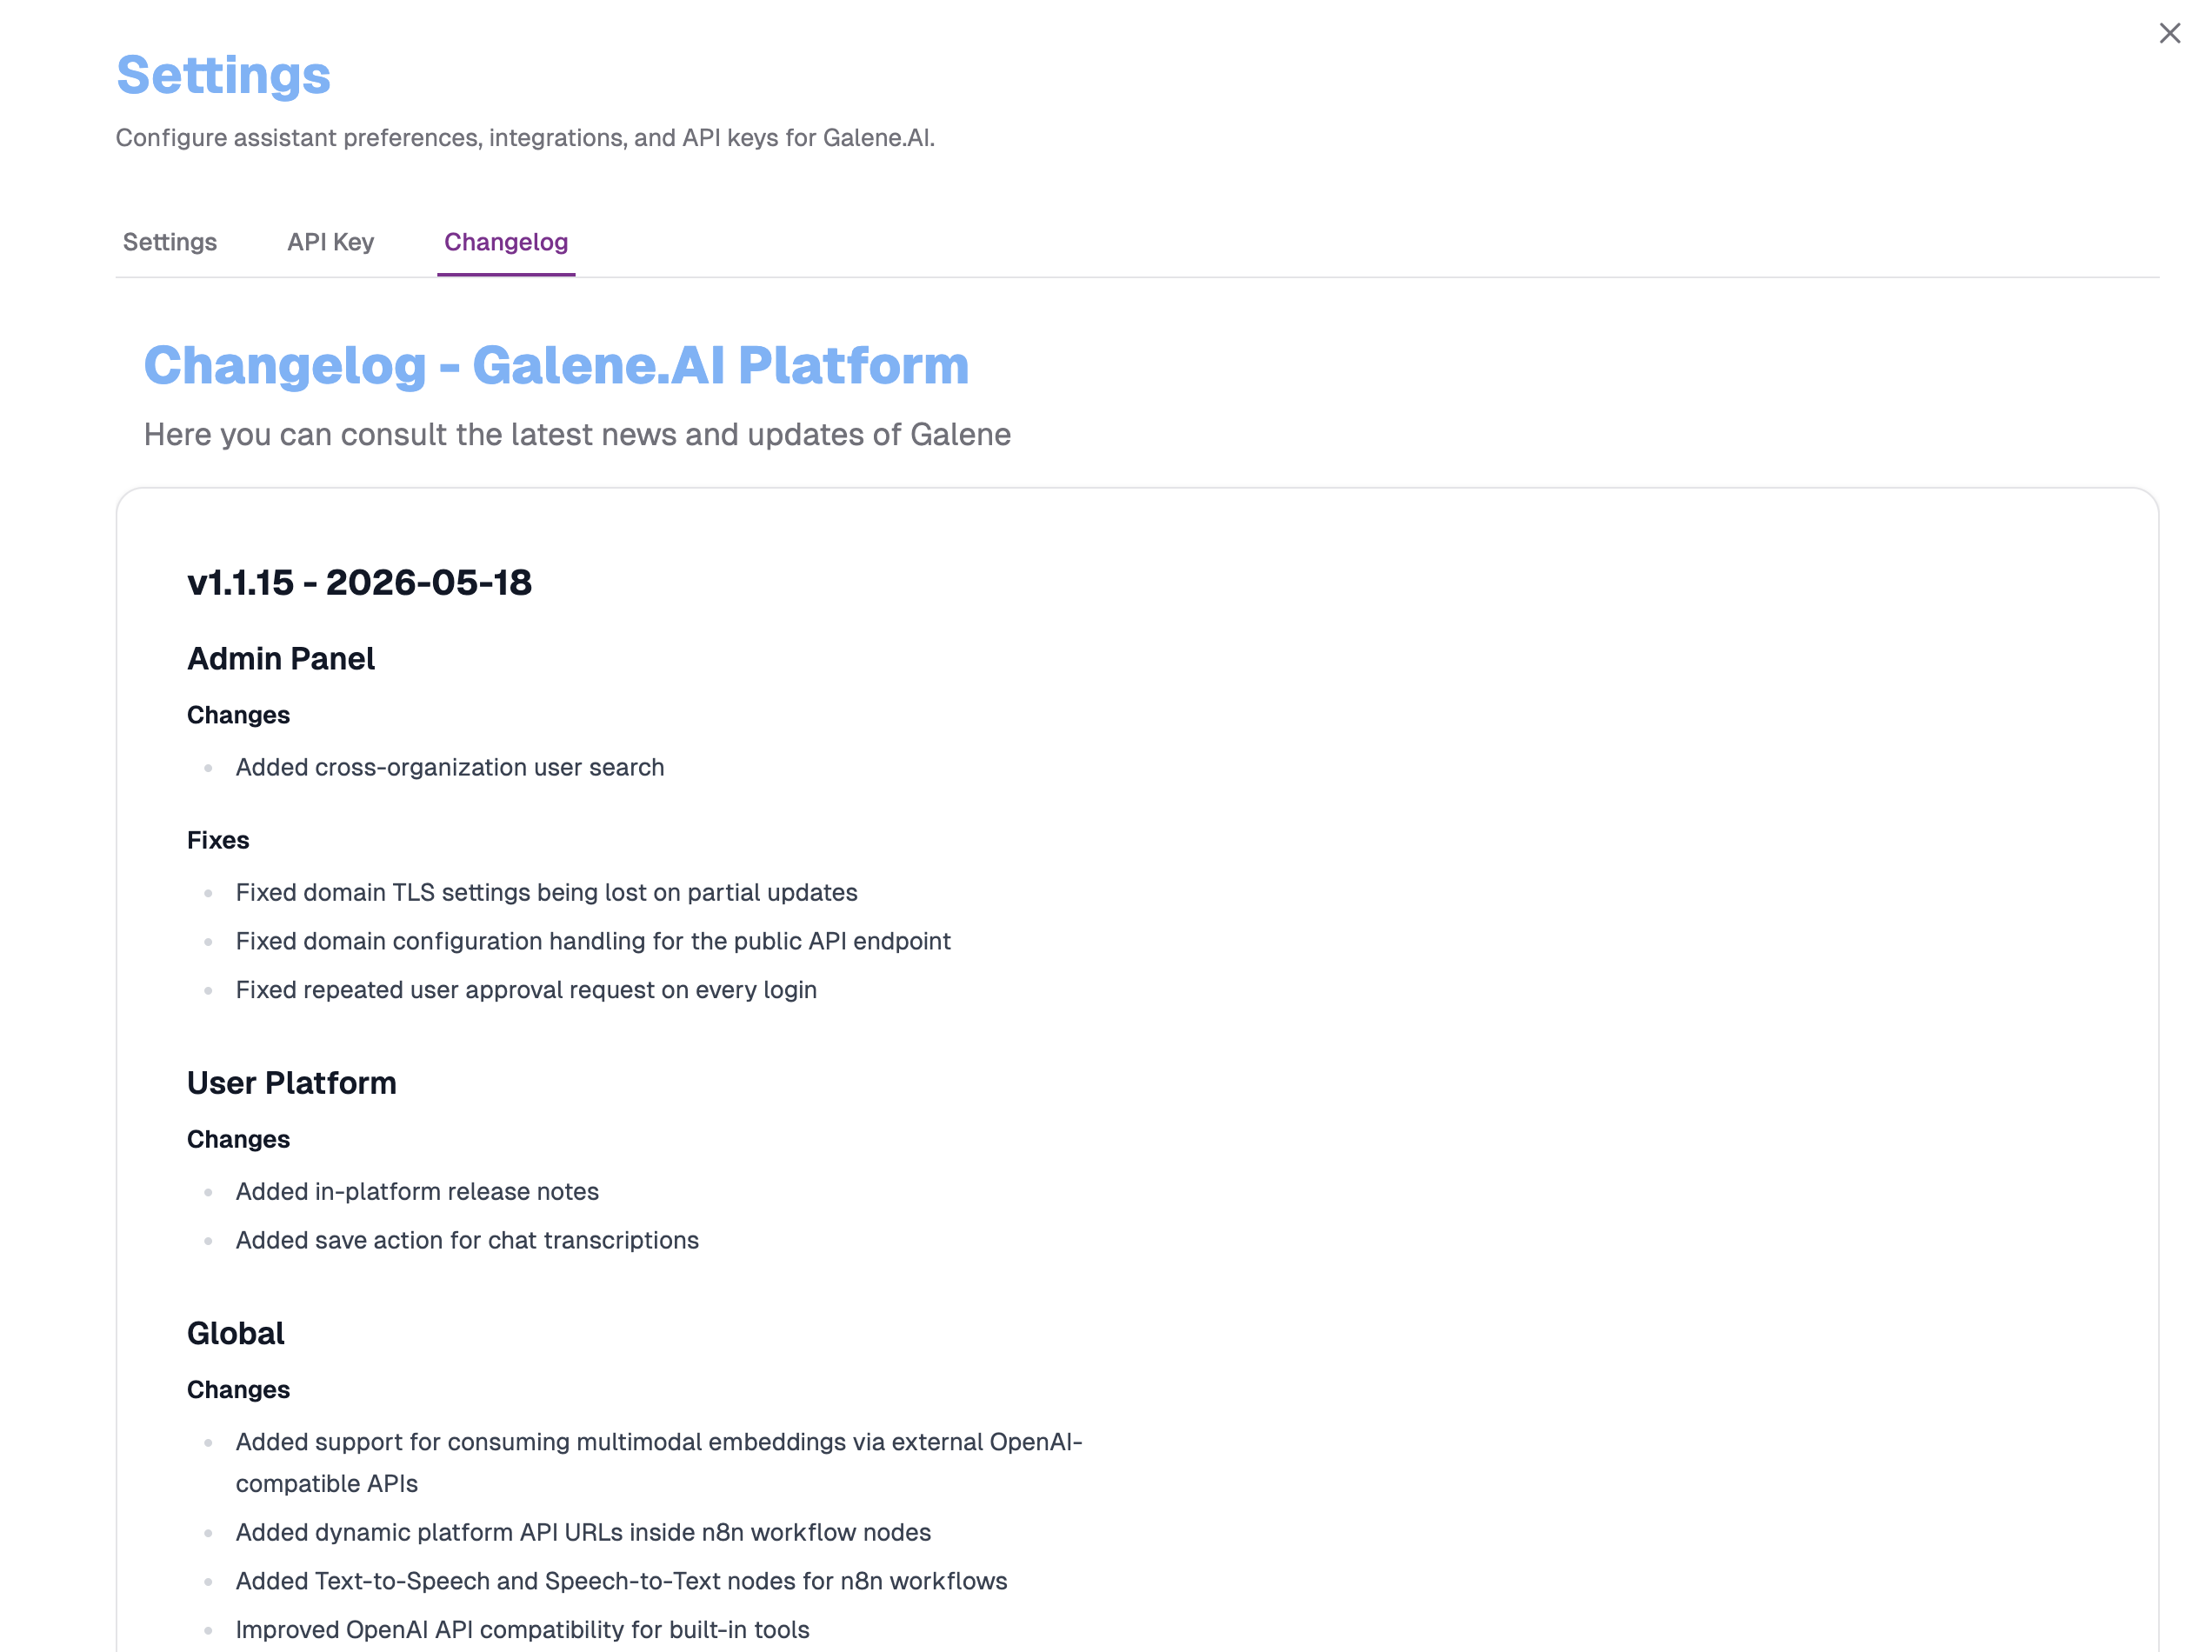
Each entry lists the version number and release date, with changes grouped by area:
- Admin Panel — updates to administrative configuration and platform controls
- User Platform — new features and improvements visible in the chat and agent interfaces
- Global — platform-wide changes including infrastructure, APIs, and integrations
Within each area, items are categorized as Changes (new features and improvements) or Fixes (bug corrections).
Quick Access
At the bottom of the left sidebar, below the username, the current platform version is displayed. Next to the version number there is an ⓘ icon: clicking it opens the Changelog directly, providing quick access to the release notes without going through Settings or the Admin Panel menu.
Release Popup Notification
At every new platform release, a popup automatically appears in the chat interface showing the release notes for that version. The popup is shown once on the first visit after an update, so you're always immediately informed of new features and fixes without needing to open Settings manually. It can be dismissed and the full history remains available in the Changelog tab at any time.